Migrate from SharePoint 2010 to SharePoint 2013 - Step by Step
So you are excited by SharePoint 2013's new features and tend to migrate from SharePoint 2010 to SharePoint 2013? Well, this article walks through moving from SharePoint 2010 to SharePoint 2013 step by step, assuming all necessary migration preparations and planning strategies are done, lets move to the core migration process.
Before you start:
No more In-place upgrade from SharePoint 2010 to SharePoint 2013! In other words - No direct upgrade is possible from SharePoint 2010 to SharePoint 2013. You can't install SharePoint 2013 on top of SharePoint 2010 (as we can install SharePoint 2010 on top of SharePoint 2007) . So only migration is allowed in SharePoint 2013. You can't re-use your existing Hardware for SharePoint 2013 (Also you can't install both SharePoint 2010 and SharePoint 2013 on same machine).
Step 1. Create New SharePoint 2013 Farm:
Install and configure new SharePoint 2013 farm. All farm configurations should be setup as in source SharePoint 2010 Farm, including: All necessary configurations like AAM, Email settings, Managed pats, etc. Install any 3rd party software, language packs, custom features and solutions you had in your SharePoint 2010 farm into your new SharePoint 2013 Farm. Create web application(s) to SharePoint 2013 environment as in your existing SharePoint 2010 farm.
As we are going to use the existing content database from SharePoint 2010, Delete the default content database associated with your new web application. If you failed to delete the web application's root site database, you will get "Orphaned Sites" issue on running Test-SPContentDatabase cmdlet as part of migration process. This is because the root site collection exists in both content databases and leads to conflict!
Step 2. Backup - Restore SharePoint 2010 Content Databases to SharePoint 2013 SQL Sever:
Backup SharePoint 2010 content databases, Restore them into SharePoint 2013's SQL Server instance.

Identify and take a list of your source content databases either from Central Administration (Central Administration >> Application Management >> Manage Content Databases )

Or use this PowerShell cmdlet to retrieve all content databases of a particular web application:
Backup Databases from SharePoint 2010 SQL Server:
Restore Database on SharePoint 2013's SQL box:
Next step is to Restore all databases taken from SharePoint 2010 to SharePoint 2013 SQL Server.
Step 3. Verify content databases with Test-SPContentDatabase:
No more STSADM -o PreUpgradeCheck and its replaced with the PowerShell cmdlet: Test-SPContentDatabase. So we got to execute Test-SPContentDatabase cmdlet which scans content databases of the provided web application and addresses any issues found.
Syntax:

Test All Content Databases and produce Report
Lets execute Test-SPContentDatabase for all Content Databases:
Check the upgrade log and deploy any missing components and re-run Test-SPContentDatabase cmdlet to verify again. Make sure UpgradeBlocking is false to move further!
Step 4. Attach Content Databases to SharePoint 2013 by running: Mount-SPContentDatabase
After fixing all issues reported by Test-SPContentDatabase, we can start attaching content databases to SharePoint 2013 web application. Remember: Always mount the root site collection's database first! Also, if you migrating My sites, Migrate My Site Host First!
Step 5. Upgrade Site Collections to move them into SharePoint 2013.
One more step to complete our migration: Upgrading site collections.
By default, after migrating from SharePoint 2010 to SharePoint 2013, All migrated site collections will be on SharePoint 2010 format, retaining its old look and feel and other functionalities. We've to explicitly migrate all site collections to SharePoint 2013.
This can be done by Site collection administrators by clicking links from upgrade reminder banner.
At Site Collection Level, you can make use of Site Collection Health Checkup:
New in SharePoint 2013, Site collection Administrators can perform health checkup at site collection level before upgrading site collections from SharePoint 2010 mode to SharePoint 2013! Navigate to

Deferred site collection upgrade - Its a replacement for Visual Upgrade feature (Once site collection is upgraded, can't be rolled back). SharePoint 2013 shipped with files to Support SharePoint 2010. Not just user interface but actual SharePoint functionality itself. E.g. You can find 14 folder on SharePoint 2013 installation. So all files will still be maintained. E.g. Features, Event Receivers, Solutions can be deployed on 14 hive, etc. So, almost all of your existing SharePoint 2010 customizations should just work fine.
You will see a banner on top of Site collections now!
To upgrade the site collections: Click on "Start now" link on the banner (You can get there by going to Site Settings >> Site Collection Upgrade as well.)
 Confirm the site collection Upgrade

We can monitor the upgrade progress with SiteUpgrade.aspx page, which provides a link to an upgrade log for troubleshooting purposes. From here, you can either start the actual upgrade or create a preview site.

SharePoint Farm Administrators can do it through bulk through PowerShell script:
We can upgrade all site collections under the specific web application with PowerShell cmdlet:
Once upgrade completed successfully, Verify Your site collection is with all new SharePoint 2013 features.
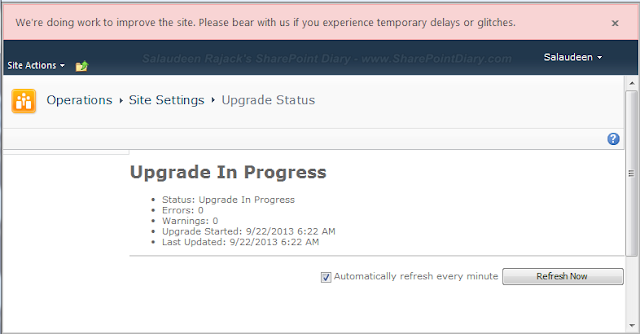
Get Upgrade Status:
Upgrade can be time consuming where there is a large number of site collections exists on the given content database. Get the Status of upgrade from "Upgrade Status" page in central administration page (Central Admin >> Upgrade and Migration >> Check upgrade status )!

Or use the PowerShell script:
That's all, We are completed now! As a best practice, Review event logs and ULS logs after migration completed successfully!!
Here is our SharePoint 2010 site:

Here is the SharePoint 2010 site migrated with SharePoint 2013:

The Final site after site collection upgrade:

Demo upgrade allows to get the SharePoint 2013 preview of existing site collection by making a copy. You can try it by clicking "Try a Demo Upgrade" link either from "Upgrade Reminder banner " or by going to
This Provisions a temporary site collection with SharePoint 2013's look and feel to validate your site collection to get the preview of your site collection on SharePoint 2013. Remember, the evaluation site collection expires after 30 days, and gets auto deleted!

Disable Self Service Upgrade
In some cases, you may want to disable self service upgrade on specific site collections, for e.g. You may want to disable upgrade on heavily customized site collections. We can disable upgrade which hides the "upgrade Reminder" bar at the top of the site collection eventually.
This disables upgrade options from site the collection by removing the upgrade banner and the "Upgrade Site Collection" button from Site collection upgrade page of site settings. So now, the only option to upgrade is: using PowerShell cmdlet: Upgrade-SPSite
What about Migrating Service Applications?
Just because you can migrate service applications, doesn't mean you must! Consider upgrading service applications from SharePoint 2010 to SharePoint 2013 when you have some critical data in it and it involves lot of time to re-do!! I'm keeping it aside for now, will cover this in an another article.
Upgrade from SharePoint 2007 to SharePoint 2013
Want to migrate from MOSS 2007 to SharePoint 2013? Sure, But there is no way to migrate from SharePoint 2007 to SharePoint 2013 directly! We've to Migrate from MOSS 2007 to SharePoint 2010 first (can use Staging environment for this!) and then perform SharePoint 2010 to SharePoint 2013 migration again (Or you can use 3rd party migration tools to upgrade from SharePoint 2007 to SharePoint 2013 directly) Read my related posts:
References:
I would strongly recommend to go through these excellent technet resources:
Before you start:
- Make sure your SharePoint 2010 farm is up-to date: Its highly recommended that you have latest service packs/patches installed on your SharePoint 2010 farm before proceeding with migration. Download Patches/Service packs from: http://technet.microsoft.com/en-us/sharepoint/ff800847.aspx
- Document your existing SharePoint 2010 environment -Assess current environment and take an inventory of all customizations. Document farm configuration settings in SharePoint Server 2010
- Refer this check list: 25 Things to Document before You Start SharePoint Migration.
- http://technet.microsoft.com/en-us/library/ff645391%28v=office.14%29.aspx .
- You can also use codeplex tool: http://spdocgen.codeplex.com/, http://spsfarmreport.codeplex.com/
- Use Upgrade Work Sheets: Use upgrade worksheets from Microsoft to document your source environment. Download upgrade worksheets at: http://www.microsoft.com/en-us/download/details.aspx?id=30370
- Change the Authentication to Claims: Claims authentication is the default authentication in SharePoint 2013. Many dependent services (like Office Web Apps) require Claims authentication in SharePoint 2013. So before migration convert your SharePoint 2010 web applications from Classic mode (which is default in SharePoint 2010) to Claims. Technet Reference:http://technet.microsoft.com/library/gg251985 Also, If you have "Forms" authentication, make sure its configured in your target farm before migration.
- Cleanup Before Migration - Clean up an environment before an upgrade to SharePoint 2013 - This includes deleting unused sites/site collections, Removing unused features and solutions, Delete orphaned users and sites, Cleanup old document versions, Removing features which are not supported by SharePoint 2013 (such as Web Analytics). Technet Reference: http://technet.microsoft.com/en-us/library/ff382641.aspx
Its recommended that you run database consistency check before taking database backup from SharePoint 2010 farm.
No more In-place upgrade from SharePoint 2010 to SharePoint 2013! In other words - No direct upgrade is possible from SharePoint 2010 to SharePoint 2013. You can't install SharePoint 2013 on top of SharePoint 2010 (as we can install SharePoint 2010 on top of SharePoint 2007) . So only migration is allowed in SharePoint 2013. You can't re-use your existing Hardware for SharePoint 2013 (Also you can't install both SharePoint 2010 and SharePoint 2013 on same machine).
Migration Steps Summary:
- Create new SharePoint 2013 Farm, Setup necessary configurations.
- Backup - Restore SharePoint 2010 Content Databases to SharePoint 2013's SQL Sever (or perform a detach-attach process)
- Verify content databases by running: Test-SPContentDatabase from SharePoint 2013 farm.
- Attach Content Databases to SharePoint 2013 web application by running: Mount-SPContentDatabase
- Upgrade Site Collections to move them into SharePoint 2013.
Step 1. Create New SharePoint 2013 Farm:
Install and configure new SharePoint 2013 farm. All farm configurations should be setup as in source SharePoint 2010 Farm, including: All necessary configurations like AAM, Email settings, Managed pats, etc. Install any 3rd party software, language packs, custom features and solutions you had in your SharePoint 2010 farm into your new SharePoint 2013 Farm. Create web application(s) to SharePoint 2013 environment as in your existing SharePoint 2010 farm.
As we are going to use the existing content database from SharePoint 2010, Delete the default content database associated with your new web application. If you failed to delete the web application's root site database, you will get "Orphaned Sites" issue on running Test-SPContentDatabase cmdlet as part of migration process. This is because the root site collection exists in both content databases and leads to conflict!
Step 2. Backup - Restore SharePoint 2010 Content Databases to SharePoint 2013 SQL Sever:
Backup SharePoint 2010 content databases, Restore them into SharePoint 2013's SQL Server instance.

Identify and take a list of your source content databases either from Central Administration (Central Administration >> Application Management >> Manage Content Databases )

Or use this PowerShell cmdlet to retrieve all content databases of a particular web application:
Get-SPContentDatabase -WebApplication "<Web App URL>" | Select Name
Optionally, you can Setting SharePoint Content databases to read-only before taking backup. But why? because you may want users to continue using SharePoint 2010, same time preventing any data in-consistency on content migrated to SharePoint 2013. To do so: Go to SQL Management Studio >> database properties >> Options >> Set Database Read-only to "True".
Backup Databases from SharePoint 2010 SQL Server:
- Log-in to SQL Server box of your SharePoint 2010 Farm
- Open SQL Server Management Studio, Expand Databases node
- Right Click your content database, Choose Tasks >> Backup

- Set the backup type to "FULL", specify the backup destination and click on "OK" to start backup process

- Wait for the backup to complete.


Restore Database on SharePoint 2013's SQL box:
Next step is to Restore all databases taken from SharePoint 2010 to SharePoint 2013 SQL Server.
- Copy all required databases backup files to your target SharePoint 2013's SQL Server.
- Open SQL Server Management Studio Right click databases node >>Click Restore Database

- Specify the source as "Device" and Click on the "..." button to add backup files. Click on "Add" button to locate backup files.

- Once done, Click on "OK" to return to the restore window.

- In Destination section , you can type new database name in Database field if you wish to rename your database.

- Click on "OK" button to start restore process. Wait for the restore successful message.

- Once restored, Go to Database properties, Click on Options Tab, Set Database Read-only to False. (If you made it read-only before taking backup!)


Step 3. Verify content databases with Test-SPContentDatabase:
No more STSADM -o PreUpgradeCheck and its replaced with the PowerShell cmdlet: Test-SPContentDatabase. So we got to execute Test-SPContentDatabase cmdlet which scans content databases of the provided web application and addresses any issues found.
Syntax:
Test-SPContentDatabase -Name <Database name> -WebApplication <Web-App-URL>E.g.
Test-SPContentDatabase -Name "SP2013_Operations_Content" -WebApplication "http://SharePoint13.Crescent.com"This would report potential issues such as: Missing Features & Solution dependencies, Orphaned Sites, wide Lists, etc. Resolve Migration issues reported by Test-SPContentDatabase.
Test All Content Databases and produce Report
Lets execute Test-SPContentDatabase for all Content Databases:
Add-PSSnapin Microsoft.SharePoint.PowerShell -EA SilentlyContinue

#Array to hold Content Databases to Test
$ContentDBS= ("SP2010_IntranetRoot_Content", "SP2010_Sales_content", "SP2010_Operations_Content")

#Web Application to Host
$WebAppURL = "http://SharePoint13.Crescent.com"

#Loop through each web web application
Foreach ($DB in $ContentDBS)
 {
     "Checking Content Database - " + $DB | Write-Host -ForegroundColor Green

      "Report to Content Database: $($db)" |  Out-File -Encoding default -FilePath $("D:\DBCheck.csv") -Append
      #Test Content Database and output report to a CSV file
      Test-SPContentDatabase -Name $DB -WebApplication $WebAppURL | ConvertTo-Csv -NoTypeInformation | Out-File -Encoding default -FilePath $("D:\DBCheck.csv") -Append

  }
This script gives nice report in CSV format for easier analysis. To troubleshoot upgrade issues reported, use http://technet.microsoft.com/en-us/library/cc262967.aspxCheck the upgrade log and deploy any missing components and re-run Test-SPContentDatabase cmdlet to verify again. Make sure UpgradeBlocking is false to move further!
Step 4. Attach Content Databases to SharePoint 2013 by running: Mount-SPContentDatabase
After fixing all issues reported by Test-SPContentDatabase, we can start attaching content databases to SharePoint 2013 web application. Remember: Always mount the root site collection's database first! Also, if you migrating My sites, Migrate My Site Host First!
Mount-SPContentDatabase -name "SP2013_Operations_Content" -DatabaseServer "G1-SP2013-DB01.Crescent.com" -WebApplication "http://sp13.crescent.com" -confirm:$falseOnce mounted the content database to web application successfully, The site collection is accessible in SharePoint 2010 Mode!
Step 5. Upgrade Site Collections to move them into SharePoint 2013.
One more step to complete our migration: Upgrading site collections.
By default, after migrating from SharePoint 2010 to SharePoint 2013, All migrated site collections will be on SharePoint 2010 format, retaining its old look and feel and other functionalities. We've to explicitly migrate all site collections to SharePoint 2013.
This can be done by Site collection administrators by clicking links from upgrade reminder banner.
At Site Collection Level, you can make use of Site Collection Health Checkup:
New in SharePoint 2013, Site collection Administrators can perform health checkup at site collection level before upgrading site collections from SharePoint 2010 mode to SharePoint 2013! Navigate to
- Site Settings >> Site Collection Administration
- Click on Site collection health checks (Or use PowerShell Test-SPSite -identity <URL>)

Deferred site collection upgrade - Its a replacement for Visual Upgrade feature (Once site collection is upgraded, can't be rolled back). SharePoint 2013 shipped with files to Support SharePoint 2010. Not just user interface but actual SharePoint functionality itself. E.g. You can find 14 folder on SharePoint 2013 installation. So all files will still be maintained. E.g. Features, Event Receivers, Solutions can be deployed on 14 hive, etc. So, almost all of your existing SharePoint 2010 customizations should just work fine.
You will see a banner on top of Site collections now!
To upgrade the site collections: Click on "Start now" link on the banner (You can get there by going to Site Settings >> Site Collection Upgrade as well.)
 Confirm the site collection Upgrade
We can monitor the upgrade progress with SiteUpgrade.aspx page, which provides a link to an upgrade log for troubleshooting purposes. From here, you can either start the actual upgrade or create a preview site.

SharePoint Farm Administrators can do it through bulk through PowerShell script:
Upgrade-SPSite -identity "http://sharepointsite" -VersionUpgrade
We can upgrade all site collections under the specific web application with PowerShell cmdlet:
#To upgrade all site collections in a Content Database
Get-SPSite -contentdatabase <content database name> -limit All | Upgrade-SPSite -versionUpgrade
Once upgrade completed successfully, Verify Your site collection is with all new SharePoint 2013 features.

Get Upgrade Status:
Upgrade can be time consuming where there is a large number of site collections exists on the given content database. Get the Status of upgrade from "Upgrade Status" page in central administration page (Central Admin >> Upgrade and Migration >> Check upgrade status )!

Or use the PowerShell script:
Get-SPSiteUpgradeSessionInfo -contentdatabase "<Content DB Name>" -showInProgress -showCompleted -ShowFailedSites will be in locked state until upgrade completed.
That's all, We are completed now! As a best practice, Review event logs and ULS logs after migration completed successfully!!
Here is our SharePoint 2010 site:

Here is the SharePoint 2010 site migrated with SharePoint 2013:

The Final site after site collection upgrade:

Additional Things to Consider:
You can try the Demo Upgrade with Evaluation Site Collection:Demo upgrade allows to get the SharePoint 2013 preview of existing site collection by making a copy. You can try it by clicking "Try a Demo Upgrade" link either from "Upgrade Reminder banner " or by going to
- Site Settings >> Site Collection Admin
- Site collection upgrade, click on Try a demo upgrade
- Site collection admin receives an email when timer job “Create upgrade Evaluation Site Collections” creates a site collection


Request-SPUpgradeEvaluationSite -identity <Site Collection URL>
This Provisions a temporary site collection with SharePoint 2013's look and feel to validate your site collection to get the preview of your site collection on SharePoint 2013. Remember, the evaluation site collection expires after 30 days, and gets auto deleted!

Remember, while upgrading: you can't downgrade! Meaning, you can't upgrade from SharePoint Server to SharePoint Foundation or You can't upgrade from SharePoint Server Enterprise to Standard version!
Disable Self Service Upgrade
In some cases, you may want to disable self service upgrade on specific site collections, for e.g. You may want to disable upgrade on heavily customized site collections. We can disable upgrade which hides the "upgrade Reminder" bar at the top of the site collection eventually.
#Get the site collection
$Site = Get-spsite "http://Intranet2013.crescent.com/sites/operations"
#Disable Upgrade options from UI
$Site.AllowSelfServiceUpgrade = $false
This disables upgrade options from site the collection by removing the upgrade banner and the "Upgrade Site Collection" button from Site collection upgrade page of site settings. So now, the only option to upgrade is: using PowerShell cmdlet: Upgrade-SPSite
What about Migrating Service Applications?
Just because you can migrate service applications, doesn't mean you must! Consider upgrading service applications from SharePoint 2010 to SharePoint 2013 when you have some critical data in it and it involves lot of time to re-do!! I'm keeping it aside for now, will cover this in an another article.
Upgrade from SharePoint 2007 to SharePoint 2013
Want to migrate from MOSS 2007 to SharePoint 2013? Sure, But there is no way to migrate from SharePoint 2007 to SharePoint 2013 directly! We've to Migrate from MOSS 2007 to SharePoint 2010 first (can use Staging environment for this!) and then perform SharePoint 2010 to SharePoint 2013 migration again (Or you can use 3rd party migration tools to upgrade from SharePoint 2007 to SharePoint 2013 directly) Read my related posts:
References:
I would strongly recommend to go through these excellent technet resources:
- Overview of the upgrade process to SharePoint 2013 http://technet.microsoft.com/en-us/library/cc262483.aspx
- Upgrade content databases to SharePoint 2013 http://technet.microsoft.com/en-us/library/cc263299.aspx
- Upgrade resources for SharePoint 2013: http://technet.microsoft.com/en-us/library/cc303420.aspx
Read more: http://www.sharepointdiary.com/2013/09/migrate-from-sharepoint-2010-to-2013-step-by-step.html#ixzz3gfr1TUex


 Important:

